Scanique.Web
Share a scanner over the network with Scanique.Web. Get access to your scanner through network using a web-browser.
Scanique.Web user's manual
About Scanique.Web
The Scanique.Web software is designed to be a way for people to share a scanner over a network such as a LAN or the Internet; it provides access to the scanner using a web browser which means that access can be gained from any modern device such as: Windows, Mac (OS X), Linux, Android and iOS. The software is safe and privacy protected; to use the scanners the computer or media access point needs to have the driver and/or additional software installed, without this a connection to the scanner cannot be made. Scanique.Web makes this an easy process; all it needs is one copy installed on the computer which is linked to the scanner. After that it can be accessed by almost any device.
The main program window
Scanique.Web is only installed on the computer which is directly connected to the scanner. Once it's been installed the software is ready to work, the scanner needs to be added to it; the default setting is suitable for most users to scan documents however you can change the setting if desired.
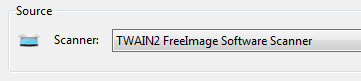 |
Using the Source drop down box in the main window, make sure the Scanner selected is the one attached to the computer. That scanner will then be available to the network. |
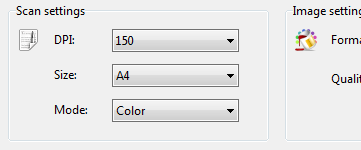 |
The Scan Settings are designed for quality or DPI, document size and color.
DPI is an abbreviation for Dots per Inch or in other words, the resolution of the document. The expected settings for scanning a text document is 100-200 DPI; scanning image will require a higher value of around 300 DPI or higher. A higher DPI means the file size will be larger and the scanning process will take more time.
The Size describes the size format of the document; the default setting is A4 size which is the standard size of documents especially office or work documents.
The Mode is the setting that dictates if the document will be in black and white, color or in grayscale once scanned. |
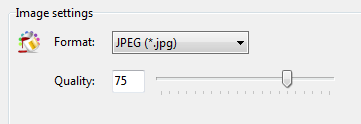 |
The Image settings set the quality or the compression of the image in the scanned file; the Format drop-down list contains the potential format settings which is defined by using the Quality slider bar. Smaller values will produce a lower quality image however it does provide a smaller file size, higher quality images will require more memory usage. While this is said, using the maximum quality value is rarely useful since it greatly increases the file size without any visual improvement in image quality; the default setting is optimal for the majority of documents as it provides quality images with a file size that is not too large. |
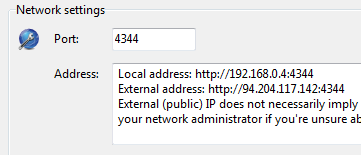 |
The Network Settings for the Scanique.Web are the necessary settings for the software to work correctly; The Port sets the HTTP port that will be available for software to use. You may need to change this setting to make sure the port is open and is not already in use by another piece of software. The Address field displays the IP-addresses the software needs to scan over the network by using a web browser; to gain access to a shared scanner the IP-address needs to be entered. However to use a Local Area Network, the computer connected to the scanner needs to have the Local Address included instead of the External IP-address. Alternatively use the External (public) IP-address to remotely access the scanner. If you are unable to connect to the local network device that you want to use with the scanner then you can use the External IP-address to access it through the Internet. If this is the case then you may need an additional configuration computer connected to the scanner. |
In short all you need to do is:
1. Set Scanique.Web up on a computer that is directly connected to the scanner, Run the program and verify the scanner is available for the software. Make sure the settings are correct.
2. Open a web browser on a computer from which you will scan the document on the network and specify the address of the computer with the scanner.
3. Click the Scan button to open the web page.
4. Save the result in the desired format at the end of the scan by clicking on the link.
That's it!
|